
Lavinia
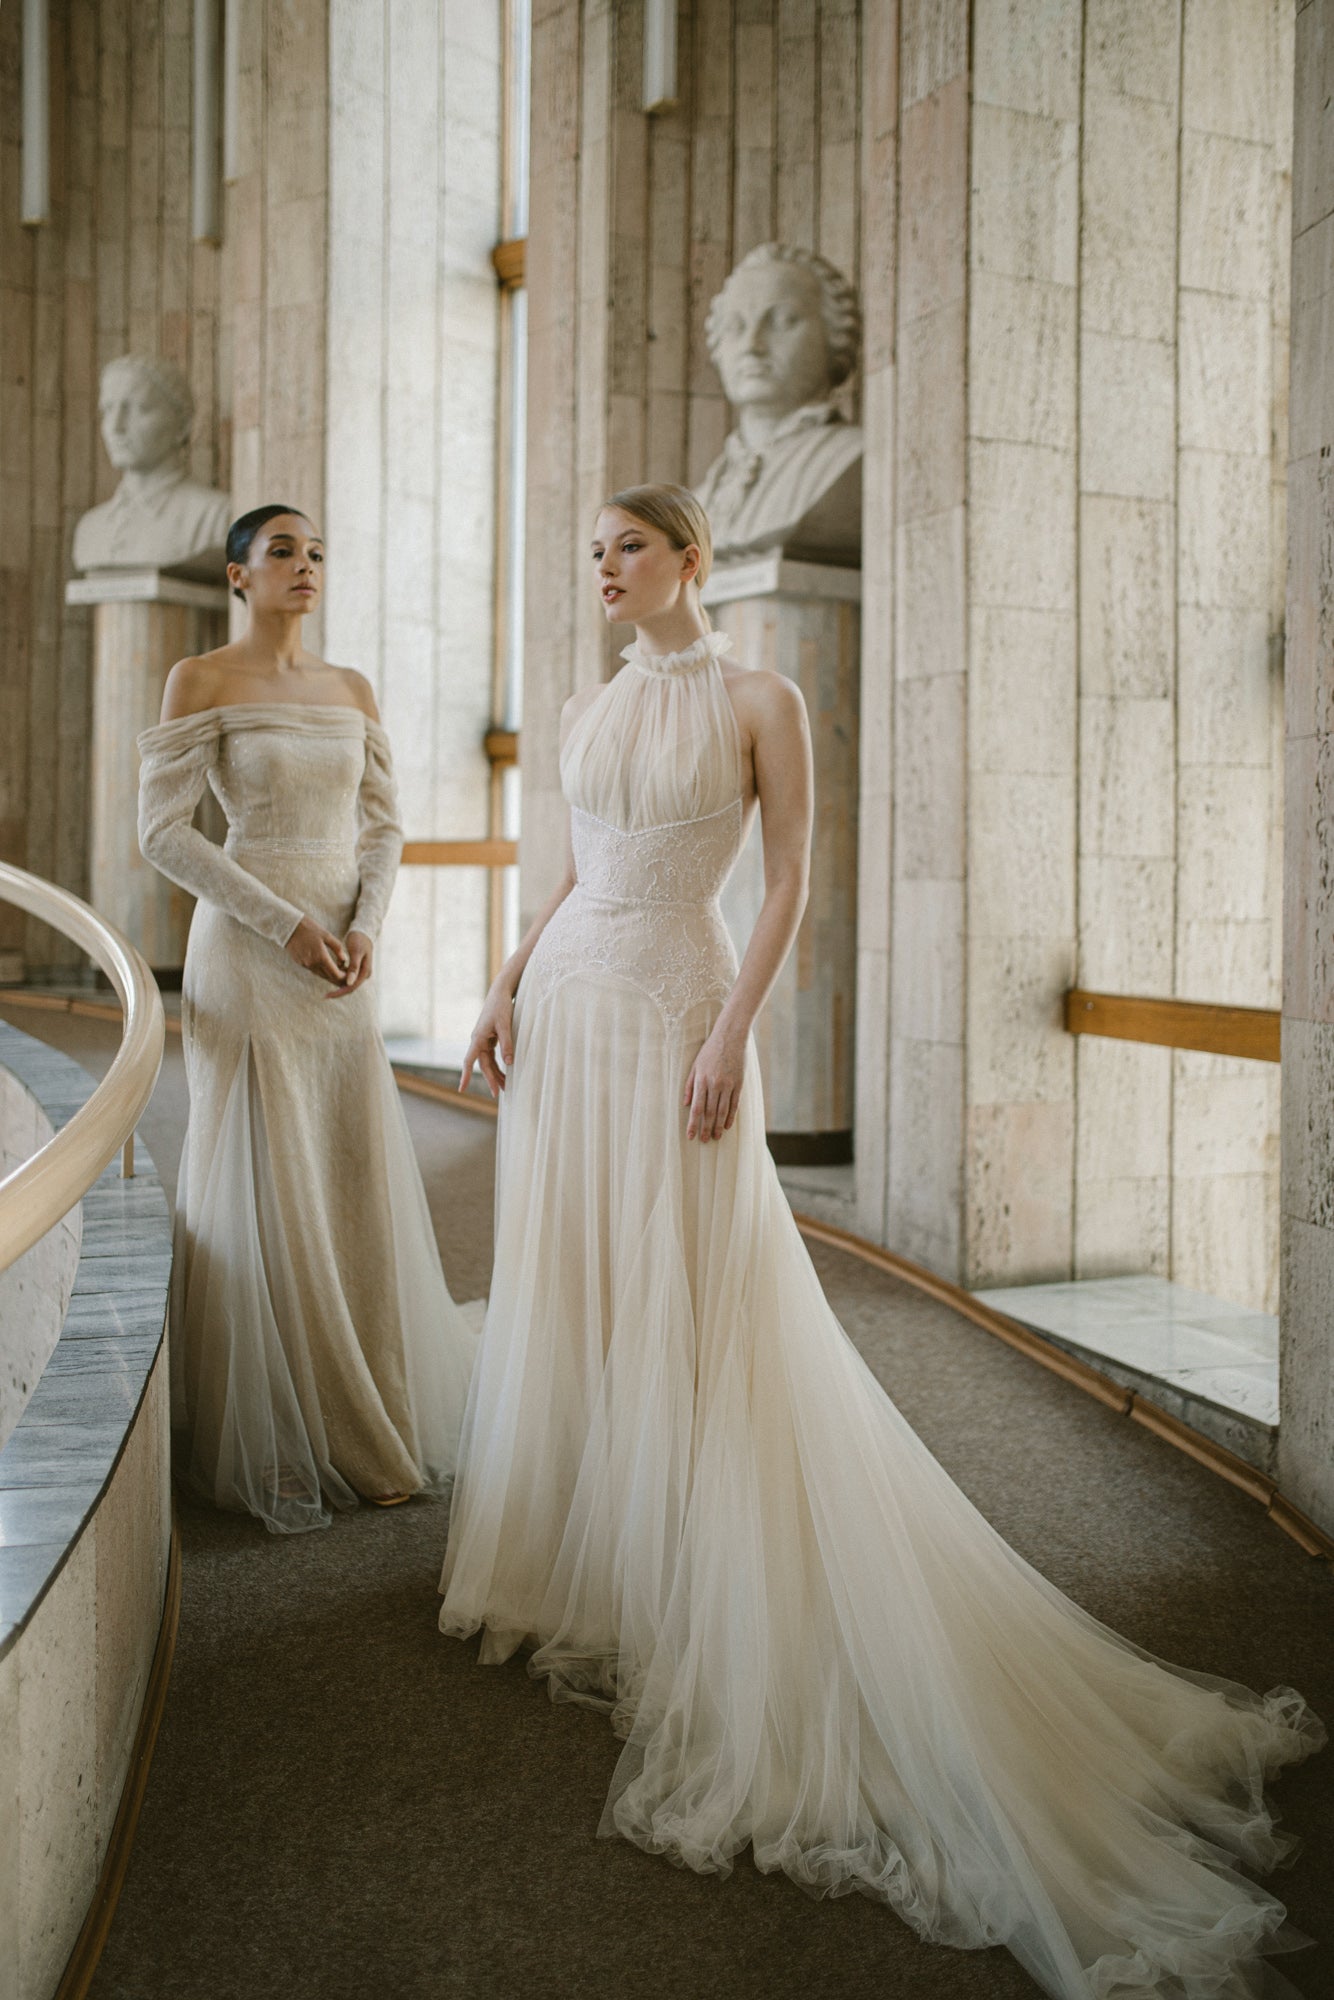
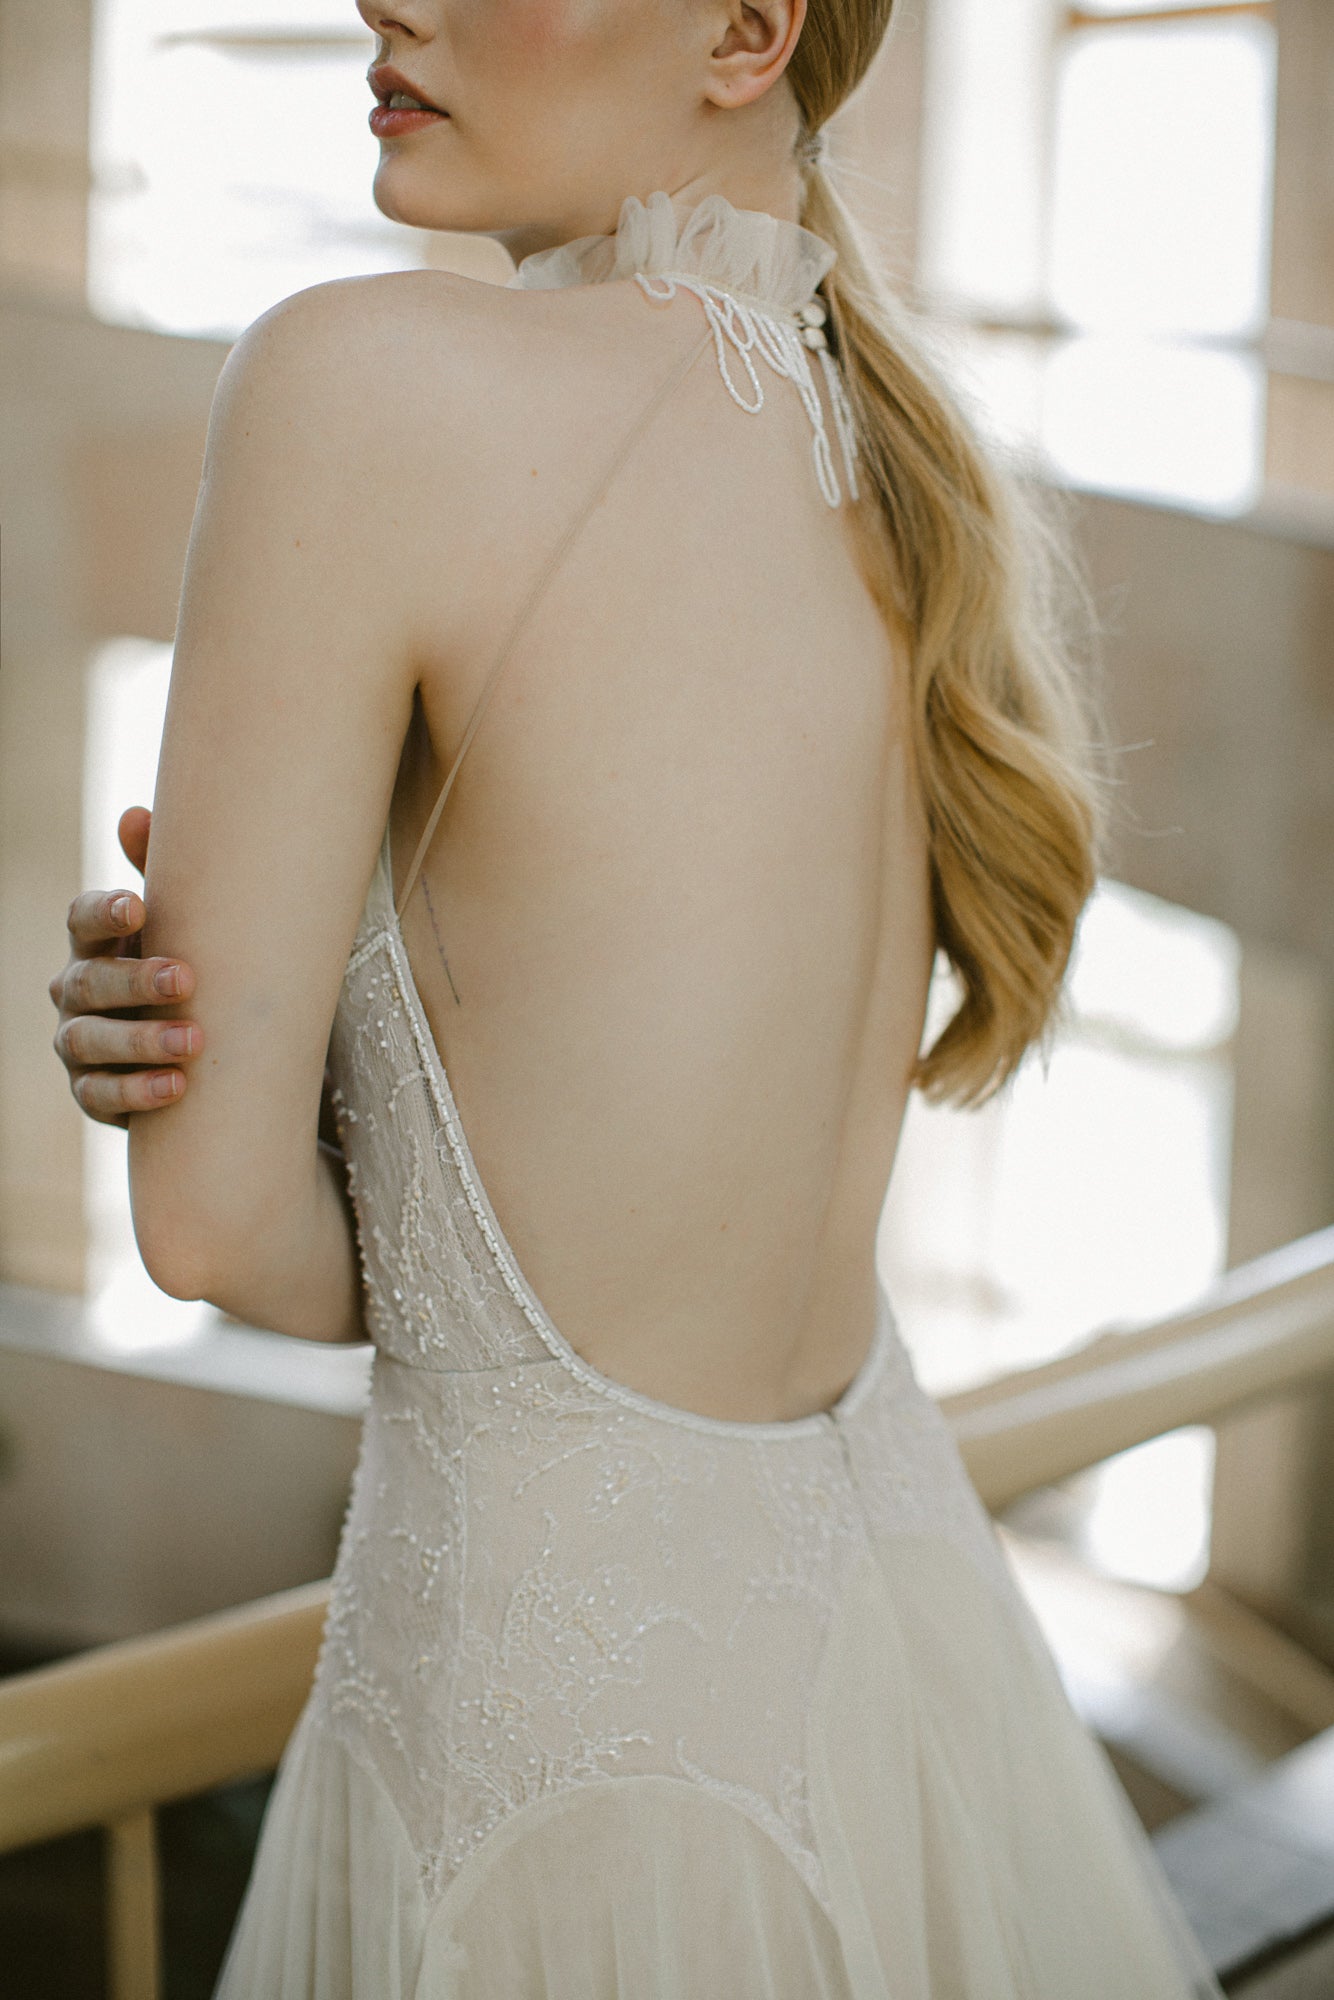
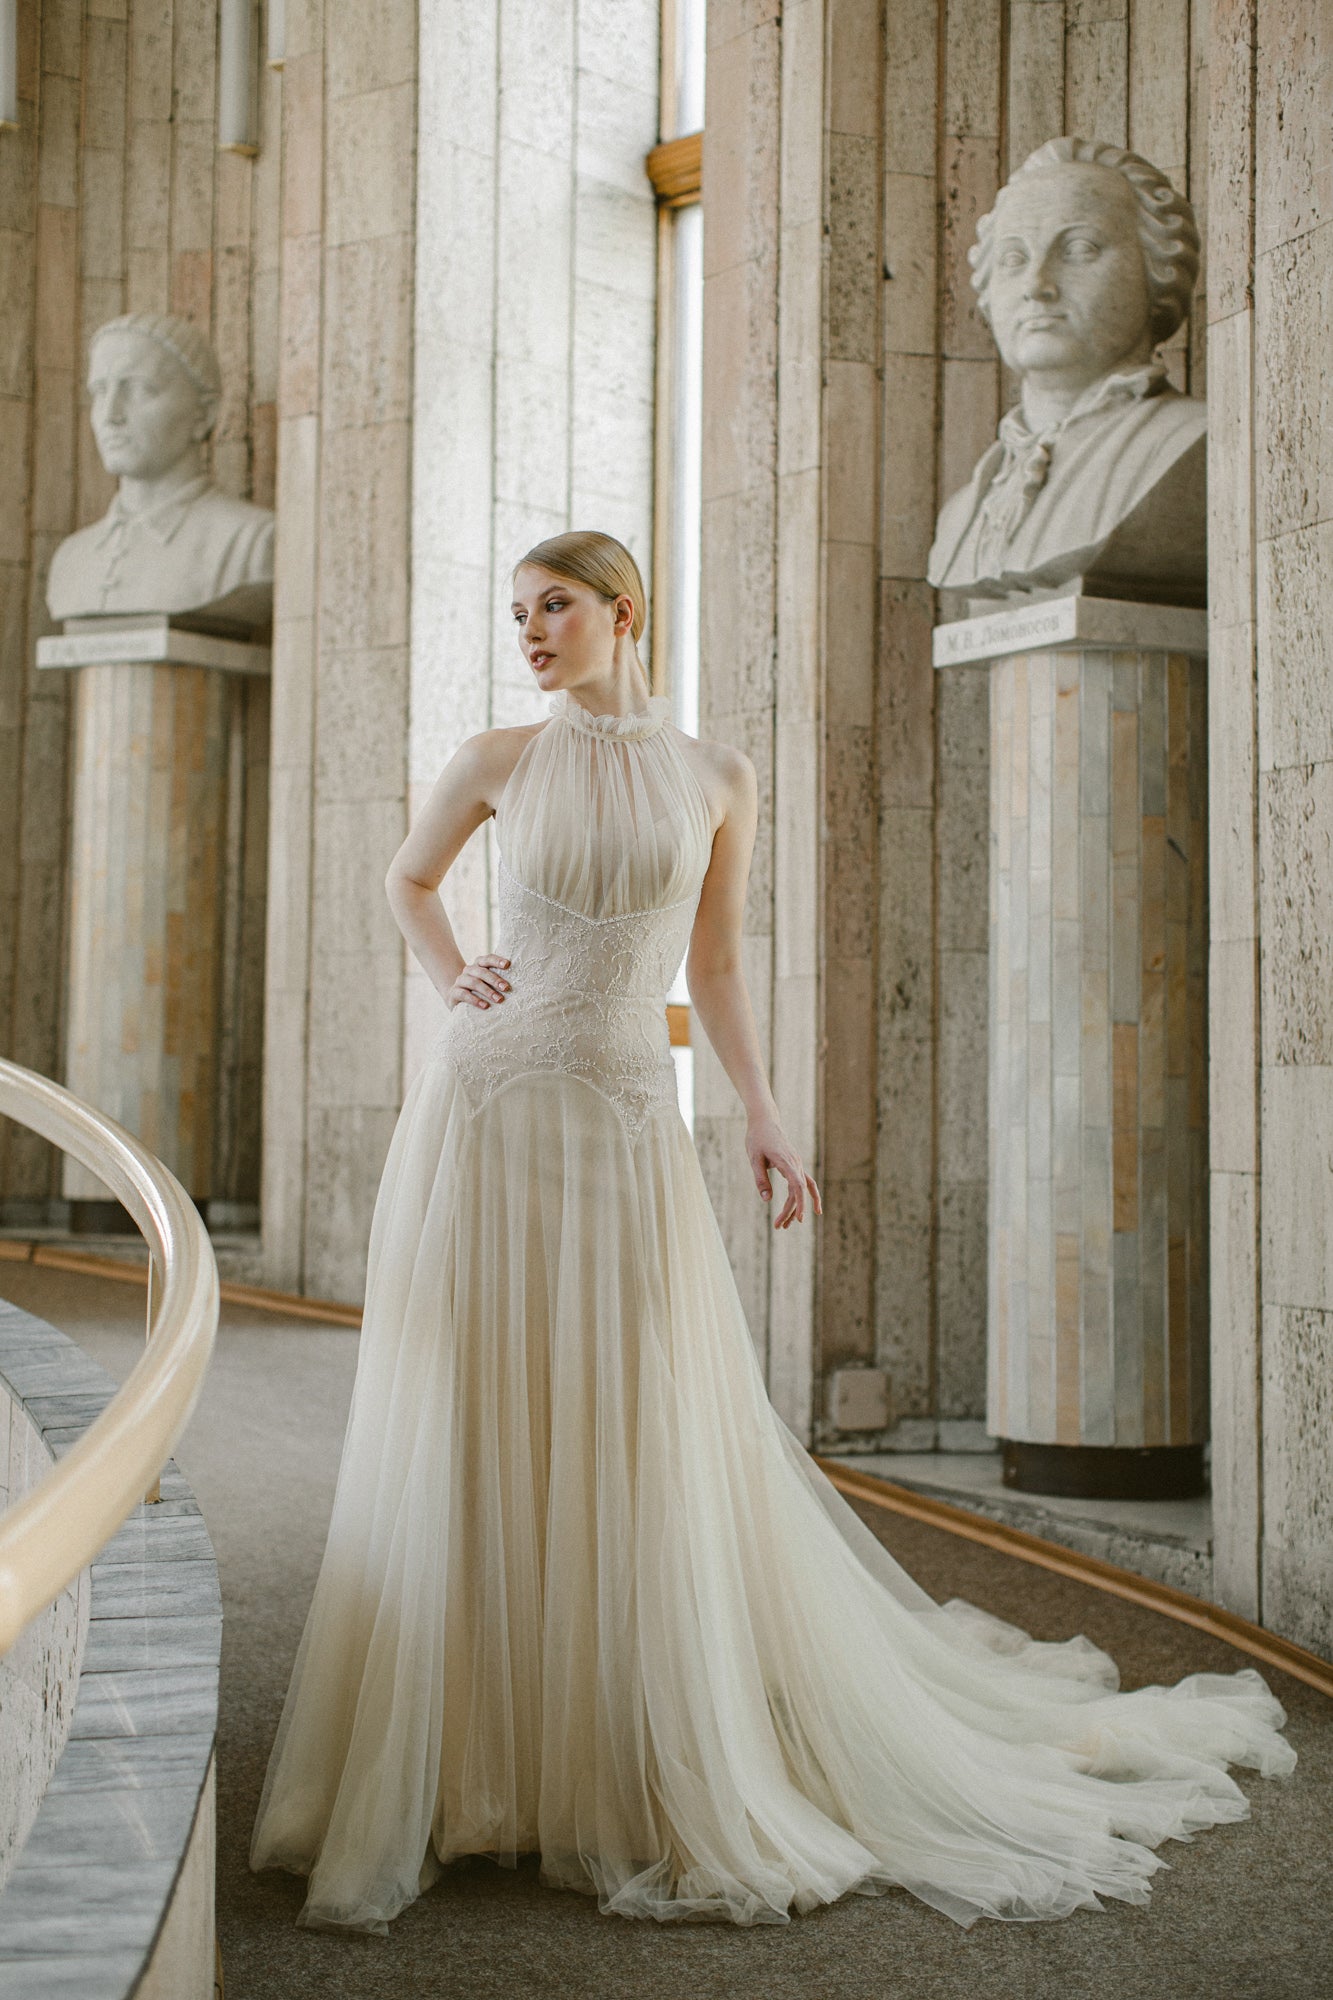
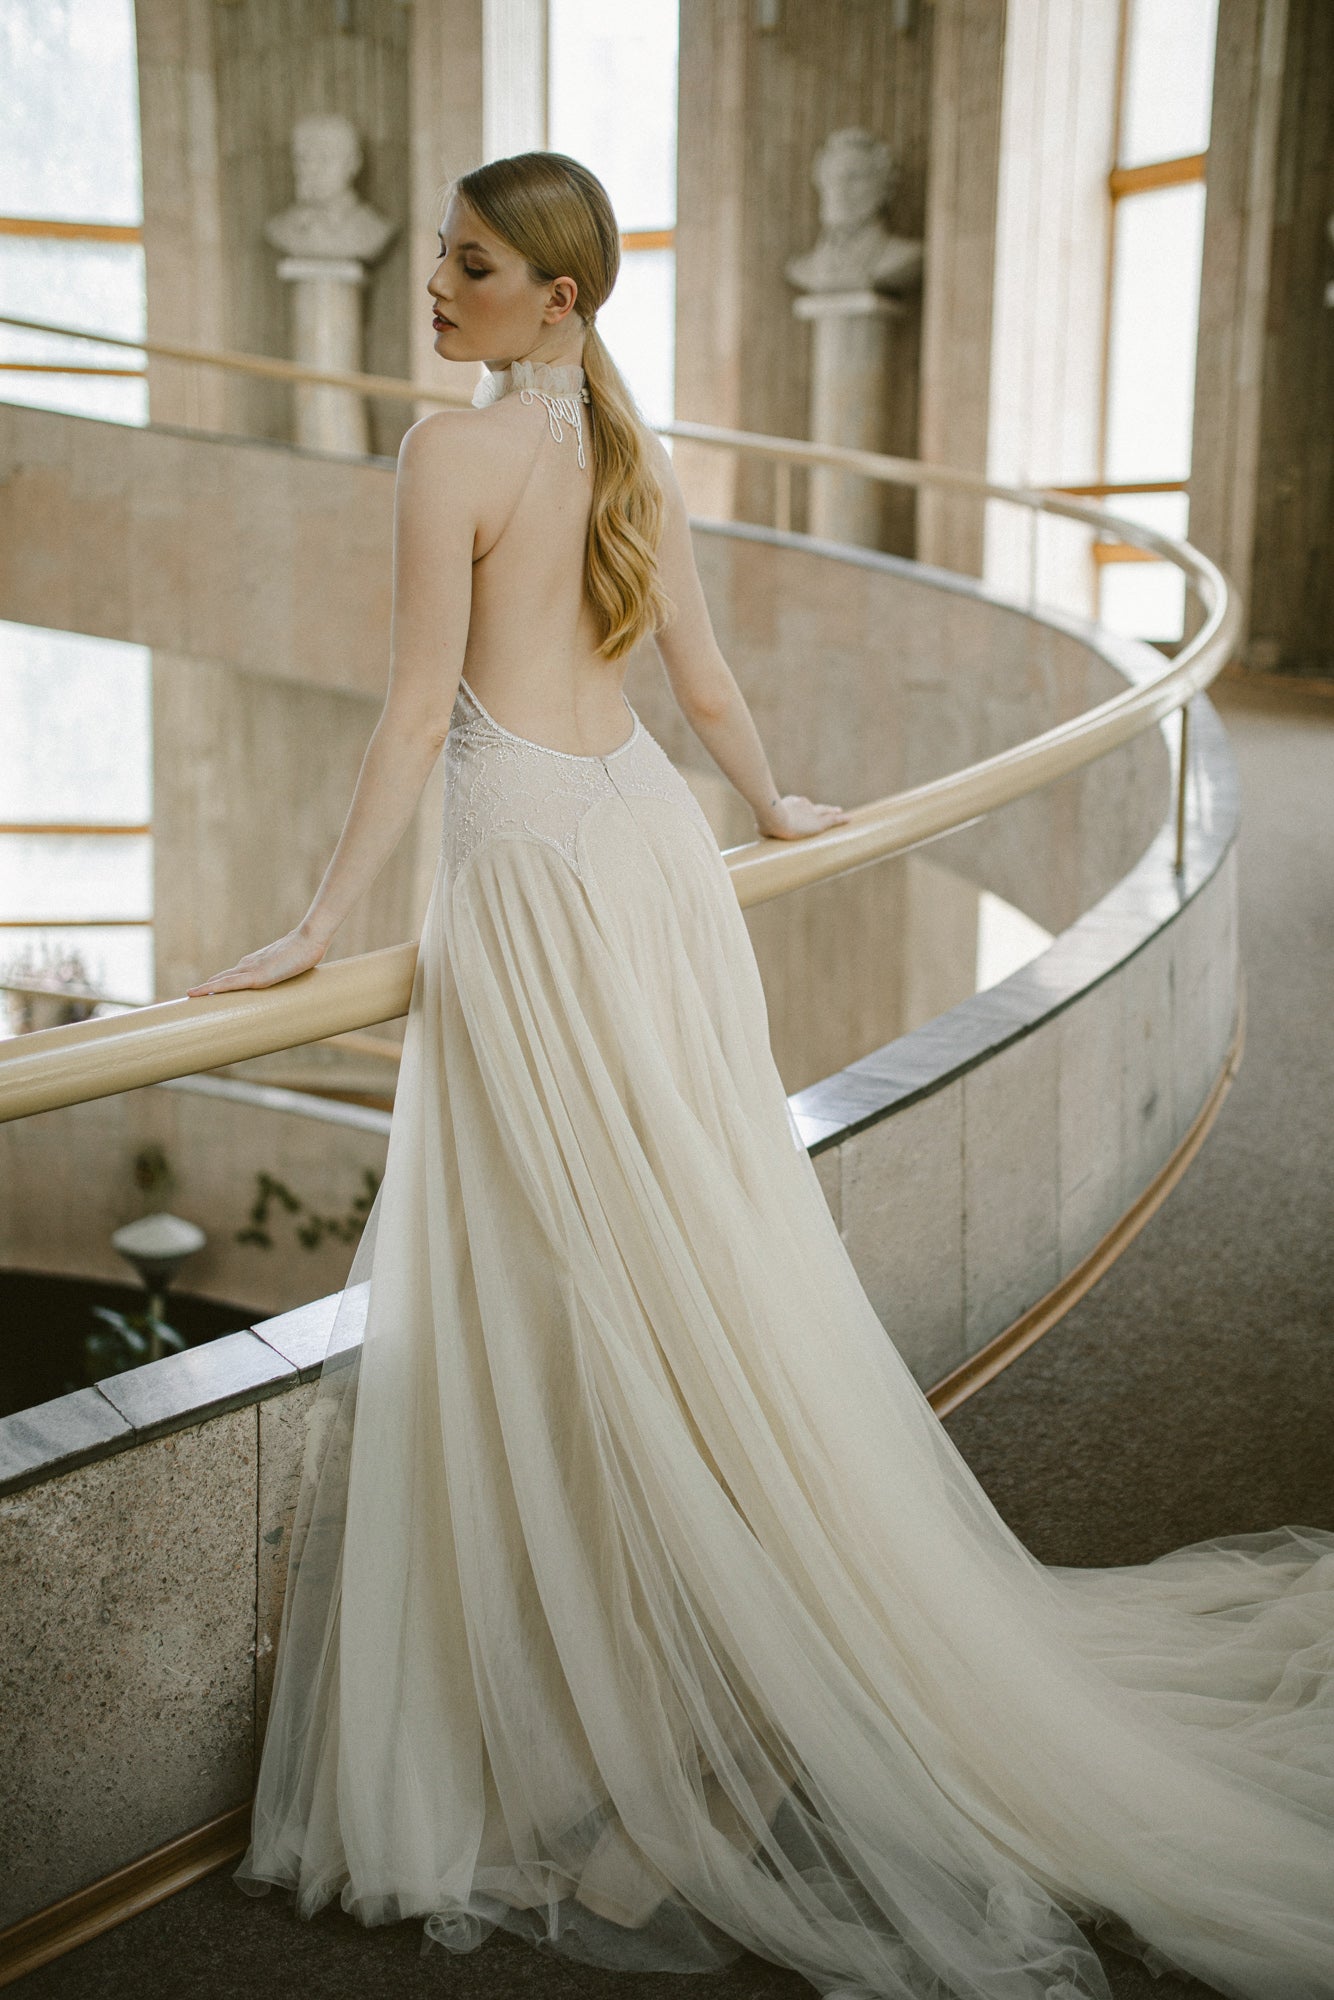
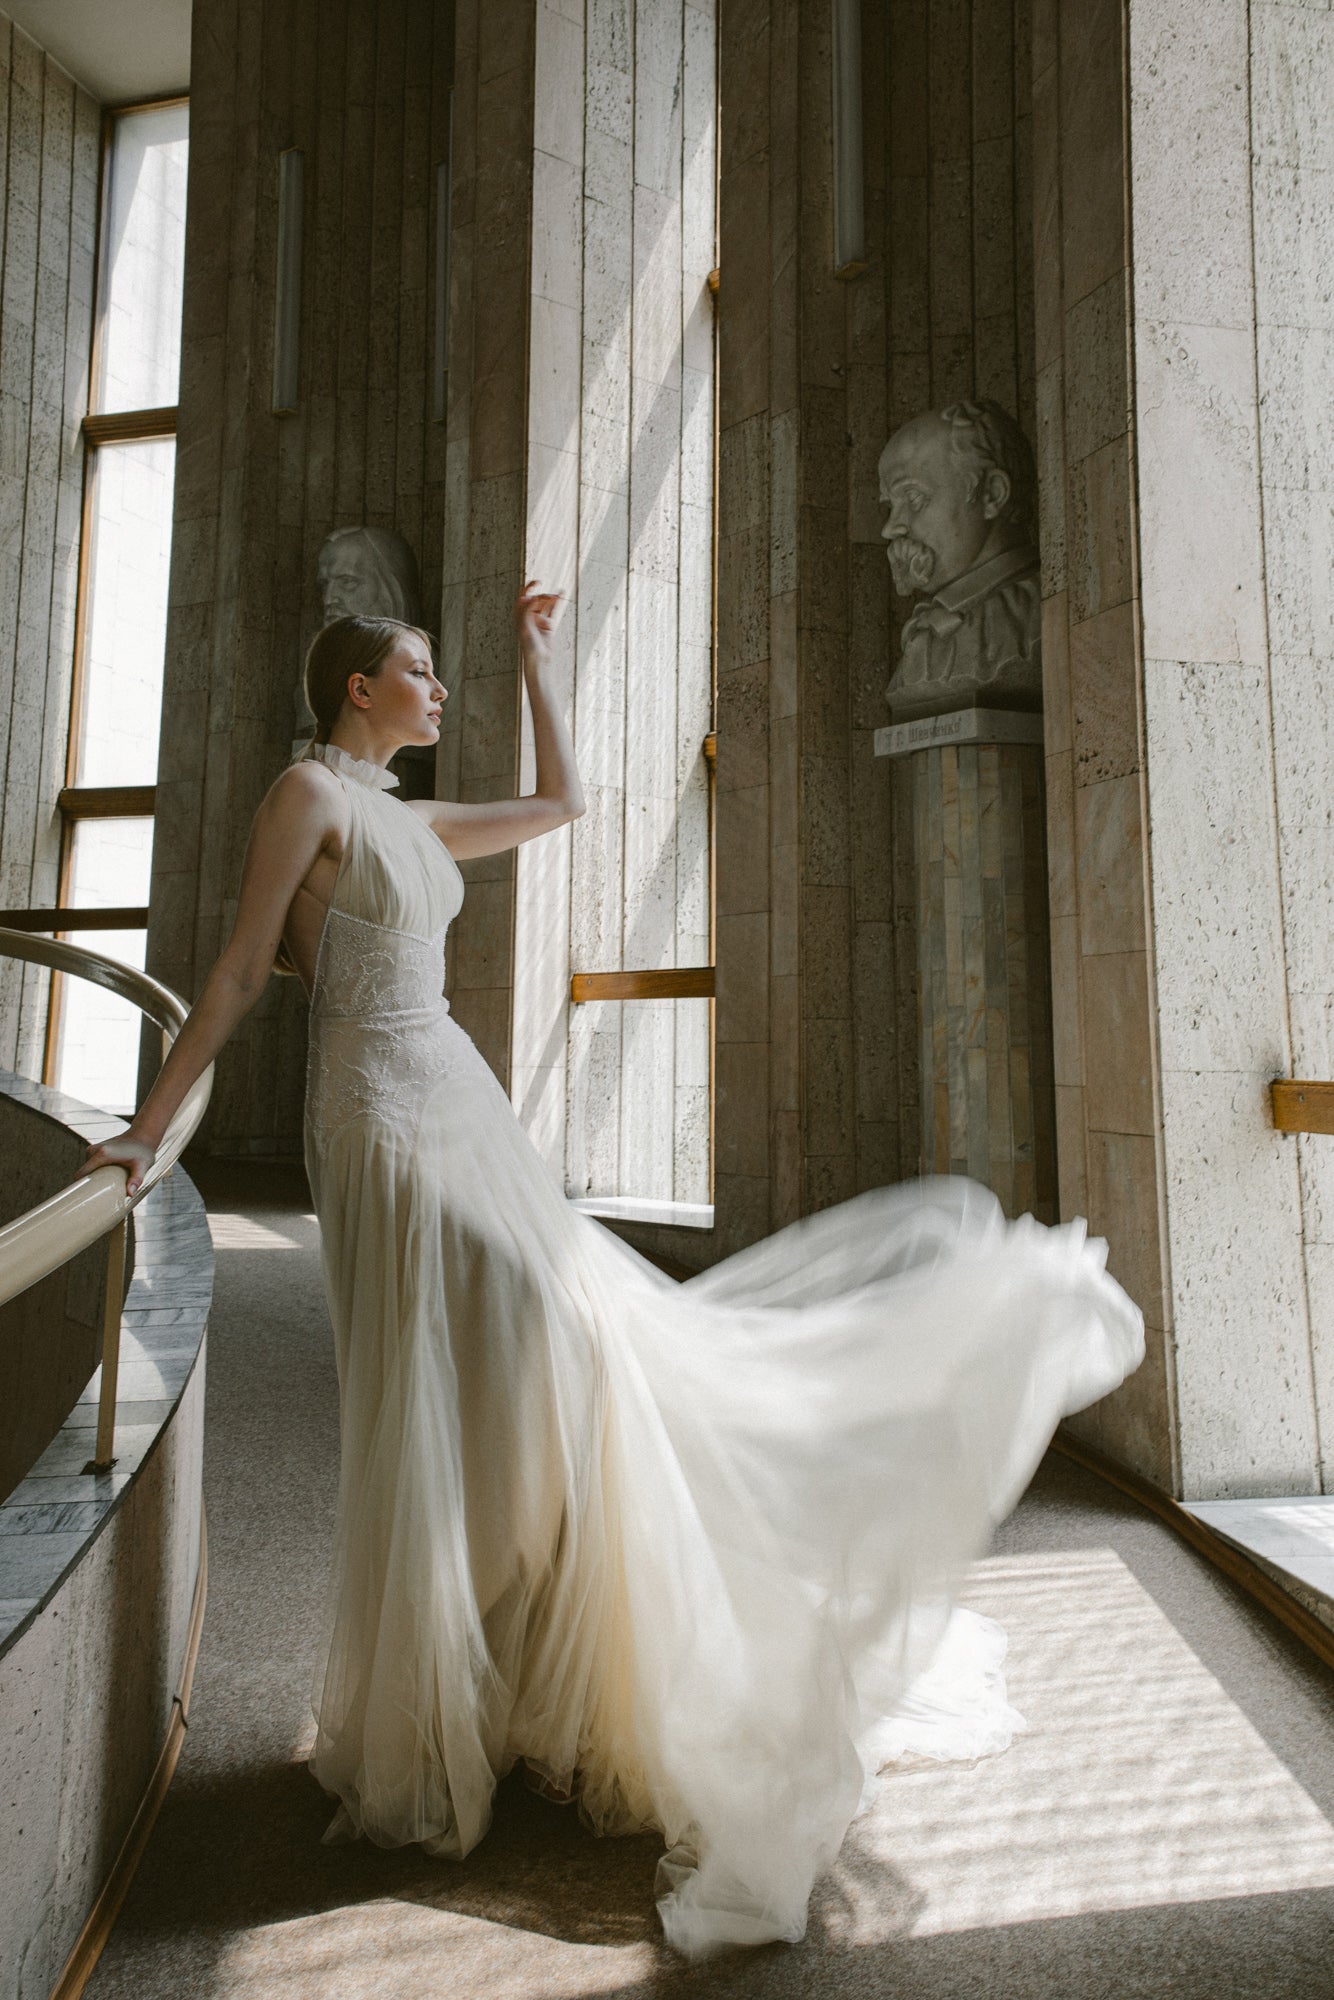
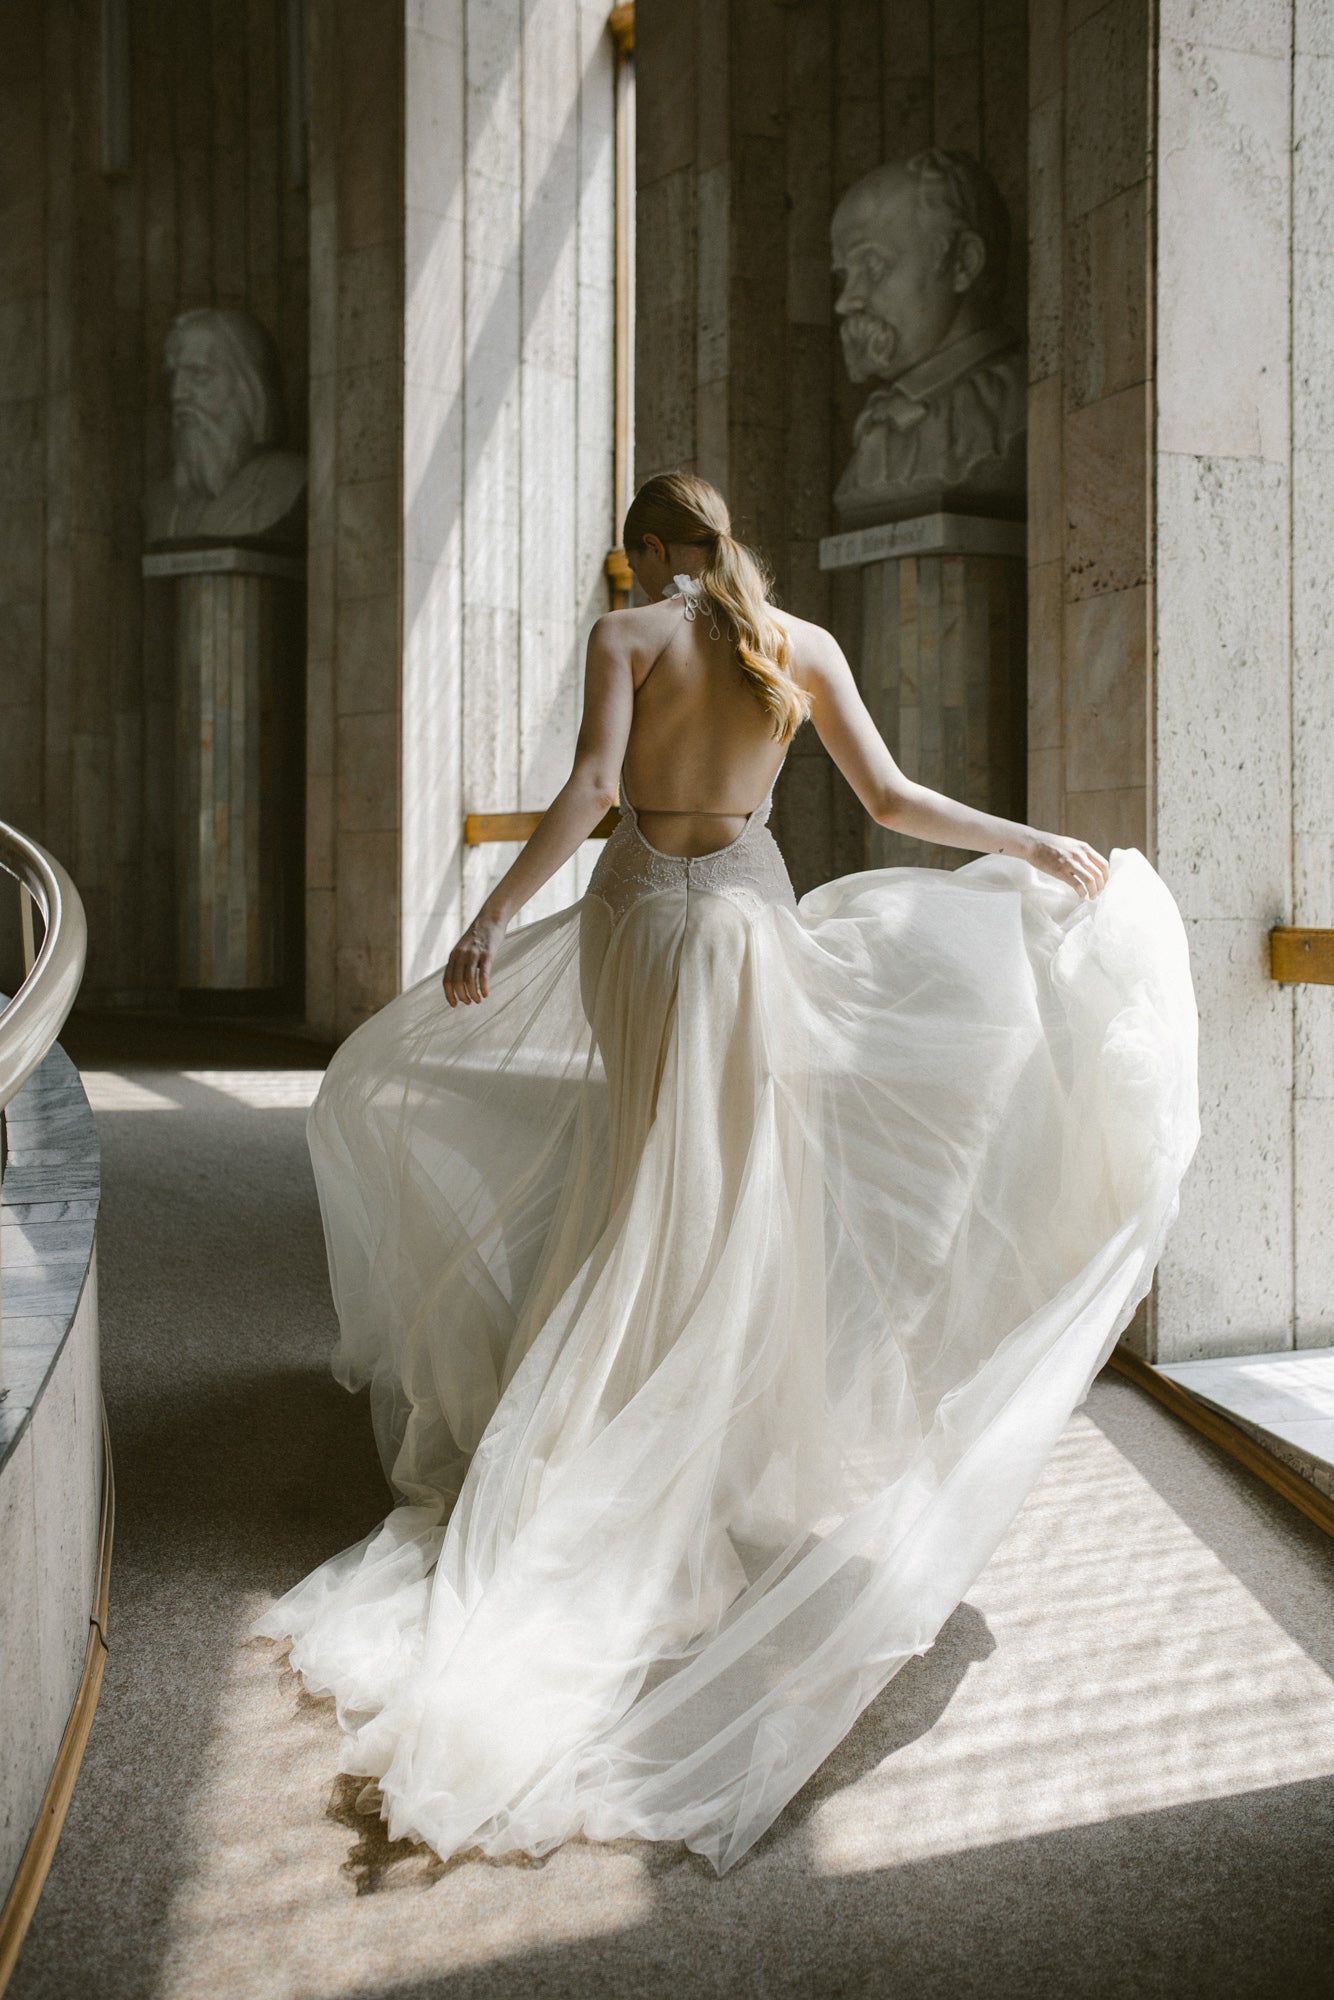
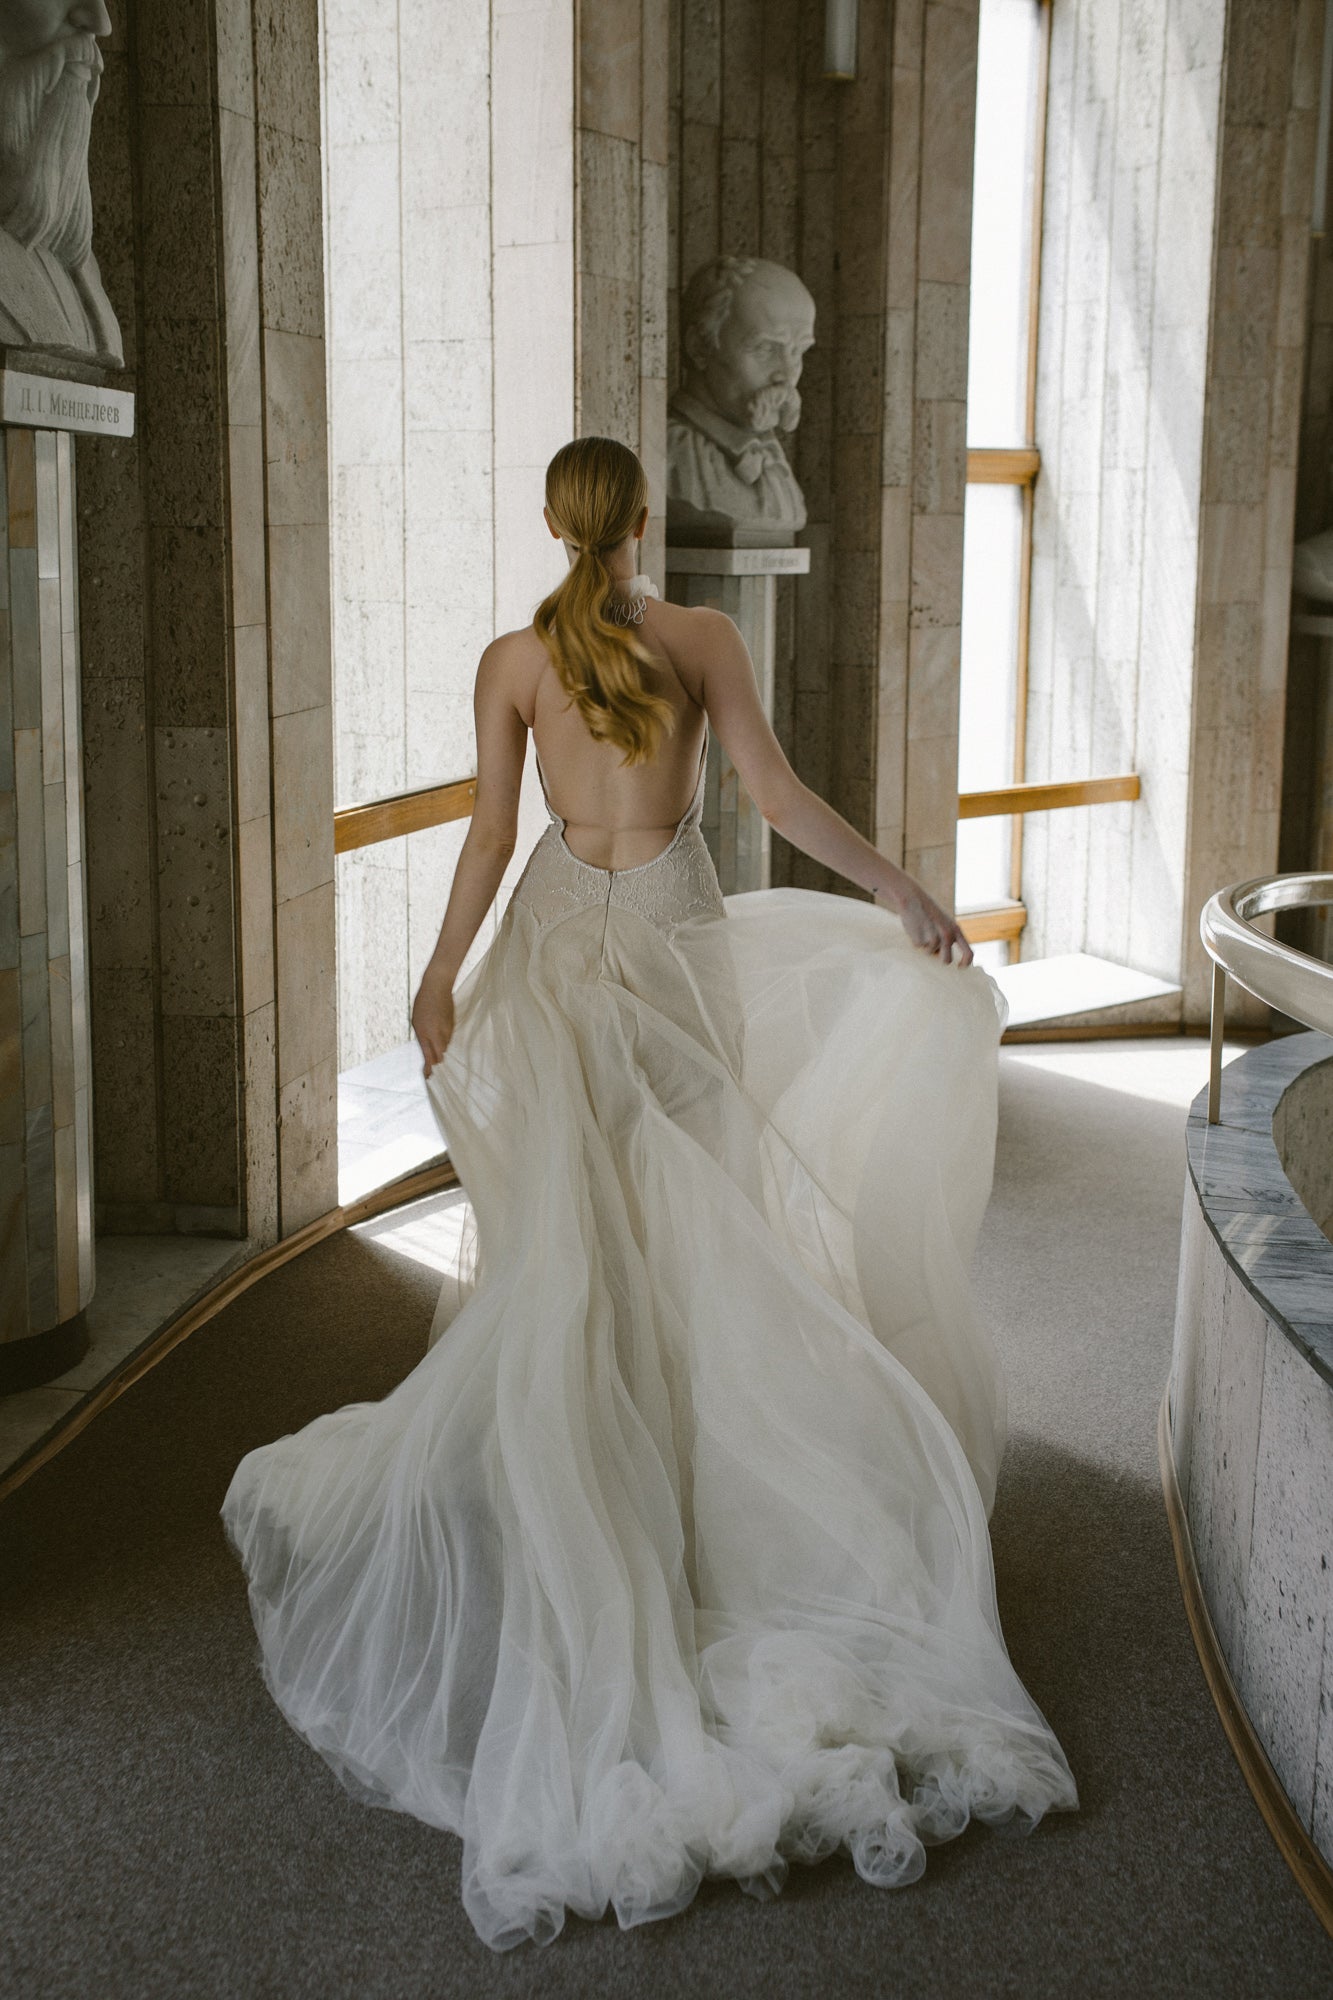
“She is a woman, therefore may be wooed. She is a woman, therefore may be won. She is Lavinia, therefore must be loved” — Demetrius, “Titus Andronicus” by William Shakespeare.
Halter neck ruffles and the deep seductive open back of Lavinia gown charm you from the first sight. The tulle pleats run down the bust area to the basque-effect corset. Embellished with twinkling beading, it supports a bust area, providing the bride with the best comfort. Champagne lace and tulle layers of the train create an unforgettable silhouette.
Dress details: halter neck, tulle pleats in bust area, ruffles on neck, boned and lined corset for bust support, hand-beaded French lace, champagne color, deep open back, long train.
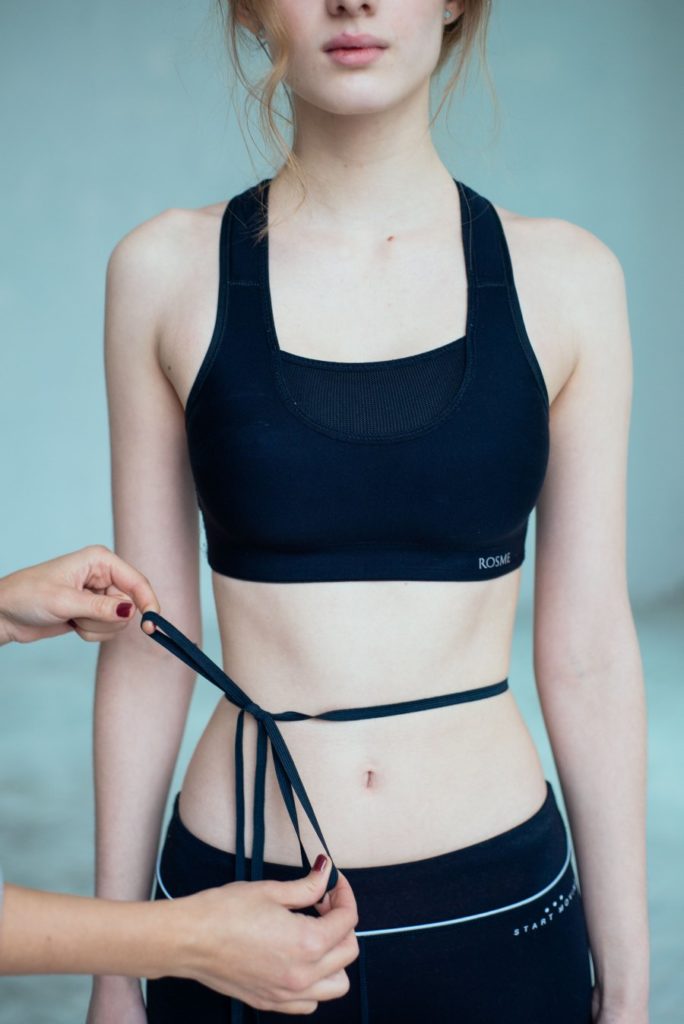
Our model is 5'9'' (175 cm) tall, bust – 31,8" (81 cm), waist - 24" (61 cm) wearing EU 36 size.
Contact Us
If you still have questions, please contact us at inquiries@mywony.com, we will be happy to help you!
How to take your measurements
Please choose your indicative size range. After placing your order you will receive an email requesting your detailed measurements for the perfect fit.
Your usual ready-to-wear size is not a reliable guide when you are ordering a wedding or evening dress. Different brands are cut to different size charts, and a bridal gown is almost never stretchable — if the waist of a zipped dress is even 1–2 cm smaller than yours, the zipper will not close. What you need are your own measurements, taken carefully. This guide walks you through all 21 of them, with a photograph for each, so you can complete the form below with confidence.
At Mýwony every gown is cut to your own body — we work exclusively in natural silks (silk crash chiffon, silk crêpe, silk organza) with hand-applied lace and silk flowers, sewn in small batches by a named atelier team. Precise measurements are what allow the craft to do its job.
Before you begin — preparation, tools & what to wear
A little preparation is the difference between a good measurement and a great one. The following takes five minutes and will save you having to re-measure.
- Ask someone to help you. You can take some measurements on your own, but most are more accurate with a second pair of hands. Ask a friend, partner or family member.
- Use a soft tape measure and a length of elastic tape. The elastic tape is used to mark your natural waistline — tie it around your waist and leave it on until every measurement is taken. It removes the single biggest source of error.
- Wear the underwear you plan to wear under the dress. Even nylon tights can reduce your hip measurement by a few centimetres; shaping underwear changes everything. If the gown has a low back or built-in bodice and you will not wear a bra, measure without one. Remember that every bra adds some volume, even soft-cup.
- Stand naturally. Straight but relaxed, feet together, arms at your sides. Do not suck in, do not puff out, do not hold your breath.
- Measure against bare skin or thin clothing — not over a sweater.
- Keep the tape horizontal for every circumference measurement — this is the most common source of error. A tape that dips in the back produces a reading 1–3 cm off.
- The tape should be snug, not tight. You should be able to slide a finger underneath without the tape sliding on its own.
- Use one unit throughout — centimetres or inches, never mixed.
Also consider the style of dress you are ordering:
- For a fully fitted dress, every measurement matters, including upper arm / bicep if the dress has sleeves.
- For a fitted bodice with a free-cut skirt, hips are less critical — focus on bust and waist.
- For a free-cut dress, only the bust measurement is critical.
If you measure yourself twice and get the same number both times, that number is reliable. If the two readings differ by more than half a centimetre (a quarter-inch), measure a third time.
Waist & torso measurements — 8 measurements
1. Waist circumference
Pass the tape along the elastic tape you tied around your natural waist. Keep it snug, not tight — you should be able to fit a finger between the tape and your body. Keep the tape level and horizontal all the way around the front and back of your waist. Do not hold your breath or pull in your stomach.

2. Upper bust circumference
Pass the tape around your back and up to the front at the level of your armpits. Keep the tape level and horizontal across the back and the bust. Snug, not tight — a finger should fit underneath. Breathe normally; do not pump up your chest.
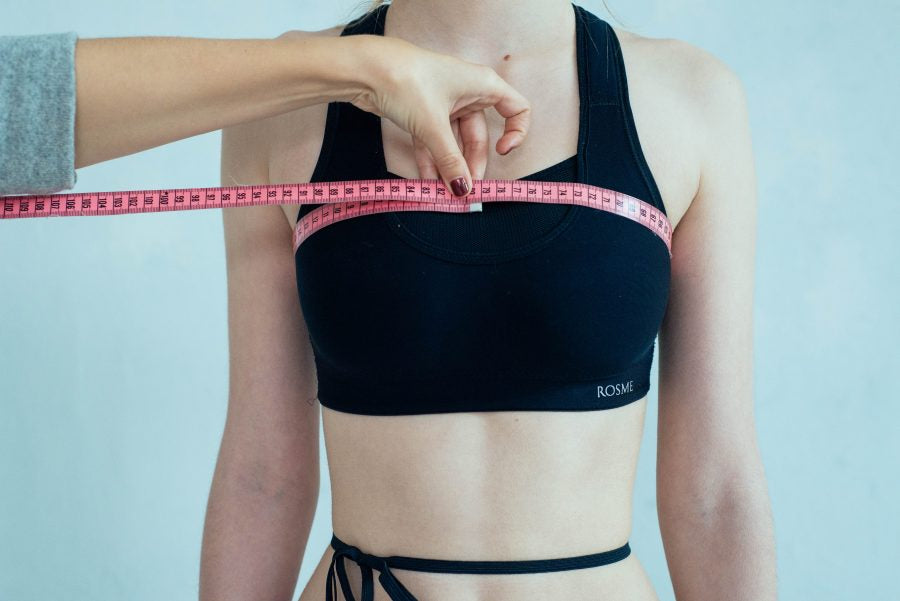
3. Bust circumference
Pass the tape around your back and across the front at the level of the fullest part of your bust. Keep it horizontal all the way around.

4. Lower bust circumference (underbust)
Pass the tape around your back and across the front just below your breasts — the same line a bra band sits on. Keep it horizontal.

5. Central front waist length
The vertical distance from the jugular fossa (the small hollow at the base of the throat) straight down to the waistline.

6. Bust point
Measure from the top of your shoulder to the fullest point of your bust. You can take measurement 7 (front waist length) at the same time, continuing the tape from this point.

7. Front waist length
Measure the vertical distance from the top of your shoulder down to your waist. Make sure the tape passes over the fullest point of your bust. Keep the tape in a straight vertical line.

8. Back length
Measured from the highest point of the shoulder at the base of the neck straight down to the waistline, parallel to the spine.

Shoulder, back & neck measurements — 5 measurements
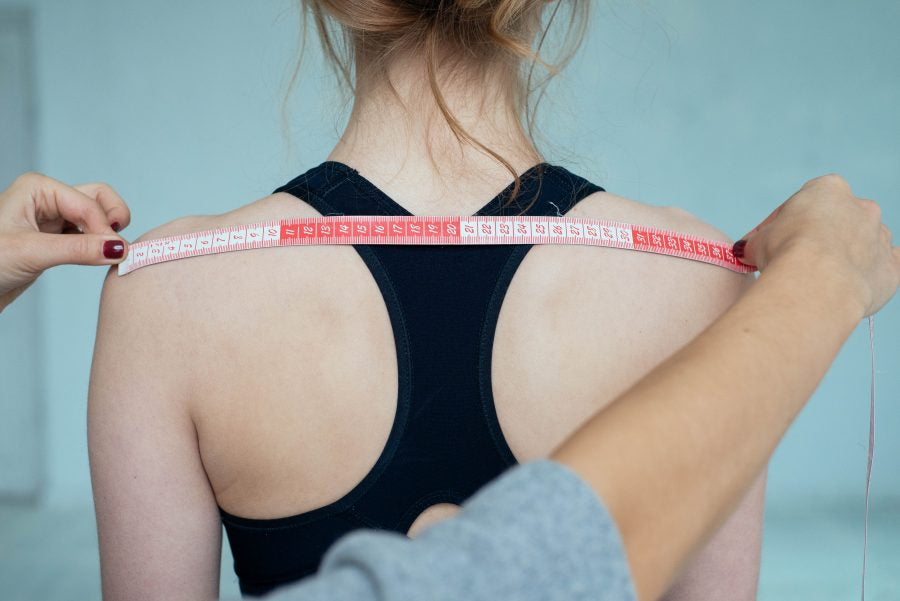
9. Shoulders
Measure the horizontal distance between the ends of your shoulders. The end of the shoulder is the small bump just before the top of the upper arm. Keep the tape level but flat against the skin. Do not push your shoulder blades back — stand in your natural posture.
10. Back width
Measure the distance between the back tops of your armpits (across the back).

11. Bust width
Measure the distance between the front tops of your armpits (across the front of the bust).

12. Breasts
The horizontal distance between your nipples. This is the bust-point measurement used to position darts and shaping seams on the bodice.

13. Neck circumference
Pass the tape around the base of your neck. Keep it loose enough that two fingers lie flat between the tape and your neck.

Arm measurements — 4 measurements
14. Upper arms
Relax your arm at your side, bicep slightly tensed. Pass the tape around the thickest part of your upper arm. Snug, not tight — a finger should fit underneath.

15. Armpits
Pass the tape around your armpit, measuring the circumference of the shoulder socket. Keep the tape in a straight vertical line around the armpit. One finger should fit underneath.

16. Cuffs
Depending on the style of sleeve you have chosen, pass the tape around your arm or wrist at the point where the sleeve will end. A finger should fit underneath.

17. Sleeve length
Measure from the top of your shoulder down to the point where you want your sleeve to end. Hold your arm slightly away from your body, not pressed against your side.

Hip, length & bodysuit measurements — 4 measurements
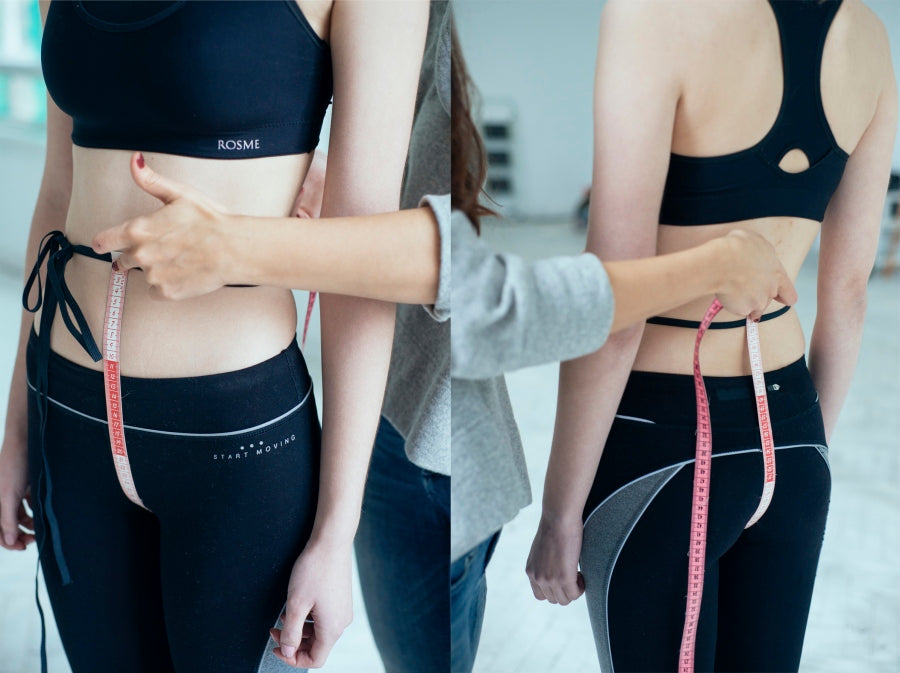
18. Hip circumference
Pass the tape around the widest part of your hips and the fullest part of your bottom. Keep it horizontal all the way around. A finger should fit underneath.


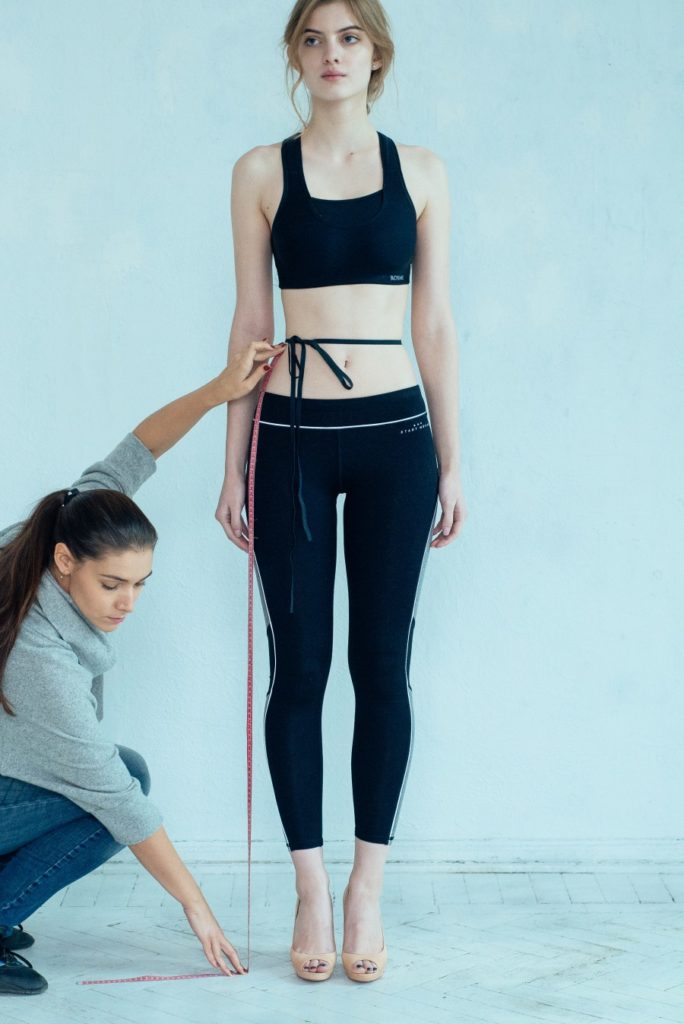
19. Skirt length
It is best to take this measurement wearing the shoes you plan to wear on your wedding day. If you do not yet have them, use a pair with a matching heel height. Measure vertically along the side seam from the waist to the floor.
20. Front waist–crotch–back waist (bodysuits only)
Pass the tape from the centre of the front waistline, down through the crotch, and back up to the centre of the back waistline. This measurement is only needed if you are ordering a bodysuit or separates with a crotch piece.
21. Hips height
Measure the distance from the base of your nape — the small bump where the neck meets the back — down to the fullest part of your bottom.

The five most common measurement mistakes
In more than a decade of atelier fittings, the same handful of errors account for most alterations. Avoiding these will save you time and money.
- Letting the tape slope. Any circumference measurement — bust, waist, hip — must stay horizontal all the way around. A tape that dips in back or rises in front produces a reading 1–3 cm off.
- Pulling the tape tight. The tape should be snug, not compressing. A tight measurement results in a tight gown.
- Measuring over the wrong undergarments. The bra you wear when you measure should be the bra you wear on the day. A strapless bra, a bralette, or no bra at all will all produce different bust readings.
- Guessing the natural waist. It is rarely where your jeans sit. It is the narrowest point of your torso, usually 5–8 cm higher. Tie the elastic tape there before you start.
- Mixing units. Centimetres and inches must not be mixed in the same set of measurements. Choose one and stay with it throughout.
What happens after you submit your measurements
Once you submit the form, our atelier reviews your measurements for consistency and flags any likely errors within two business days. If anything looks off — for example, a bust and underbust measurement that do not match a standard cup-size relationship, or a sleeve length that seems unusually short — we write to you directly to confirm or re-measure before we cut a single piece of fabric.
For made-to-measure gowns, your measurements are used to create a pattern cut specifically for your body. Every Mýwony gown is constructed in natural silk — silk crash chiffon, silk crêpe, silk organza — with hand-applied lace and, where called for, hand-stitched silk flowers. For ready-to-wear or size-standard gowns, your measurements help us select the closest size and advise on likely alterations.
From there your dress moves through the atelier — pattern-cutting, couture construction, hand-finishing — and arrives in time for your first fitting (typically eight to twelve weeks, depending on the gown and season). Two to three fittings follow, during which we fine-tune the fit against the live measurements of your body on the day.
If you have not yet chosen your gown, you can browse our current couture collection Spells of the Whispering Forest, the full Mýwony collection, or the 2024 collection. If you would like help choosing a silhouette, our wedding dress styles chart is the best place to start.
Frequently asked questions — 11 questions
How do you take a bust measurement?
Stand naturally with arms at your sides. Wrap a soft tape around the fullest part of your bust — usually across the nipples — keeping the tape horizontal all the way around. The tape should be snug but not compressing. Wear the bra you plan to wear on your wedding day, and do not hold your breath.
What is a bust point measurement?
The horizontal distance between the two apex points of the bust (nipple to nipple). It is used in dressmaking to place bust darts and shaping seams correctly on a bodice. Measure with the tape held flat across the front, not curved around the bust.
Where exactly should I measure my bust for a wedding dress?
At the fullest point of the bust — usually the line that passes across the nipples. Keep the tape horizontal all the way around; it must not dip or rise at the back. Wear the bra you plan to wear on the day, stand naturally, and keep the tape snug but not tight.
What is the difference between bust and underbust measurement?
The bust measurement is the circumference around the fullest part of the bust (across the nipples). The underbust (or lower bust) is the circumference directly beneath the bust, where a bra band sits. The difference indicates cup volume and is essential for corset-style gowns and bodices with internal cups.
How do I measure armpit to armpit?
Locate the armpit crease on each side of your torso — the vertical fold where the arm meets the body. Measure the horizontal distance between them across the back (back width) or across the front (bust width), depending on which is specified. Keep the tape flat against the body.
What is the natural waist and how do I find it?
Your natural waist is the narrowest part of your torso, usually 5–8 cm above where jeans typically sit. Bend sideways — the natural fold that forms is the waistline. Tie an elastic tape there and leave it on until every measurement is taken.
Do I need to wear a bra when measuring?
Yes — and specifically the bra you plan to wear on your wedding day. Bust and bodice measurements change meaningfully depending on the bra. If you are unsure, a smooth nude non-padded bra is the safest default. If your dress has an open back or built-in bodice and you will not wear a bra, measure without one.
How accurate do wedding dress measurements need to be?
Very accurate. A measurement that is one centimetre off (about 3/8 in) can require a significant alteration at fitting. Measurements should be taken to within half a centimetre of accuracy. If you take a measurement twice and get the same number, it is reliable; if they differ by more than half a centimetre, measure a third time.
Can I measure myself for a wedding dress?
You can for some (waist, hip, wrist), but accuracy is significantly better with a helper for bust, back length, shoulder width, and sleeve length. If you must measure alone, use a mirror to verify the tape is horizontal for every circumference measurement, and record each measurement twice to cross-check.
How long does it take to measure yourself for a wedding dress?
About 20–25 minutes with a helper, or 35–45 minutes on your own. This includes the 21 measurements on the Mýwony form plus time to verify each one.
What should I do if I am between sizes on the standard chart?
For Mýwony made-to-measure gowns this is not an issue — we build to your exact numbers. For ready-to-wear, always size up, not down. It is far easier to take in a gown than to let it out, and many gowns cannot be let out at all.
If any measurement does not seem to fit your body in a standard way, please write to us. We have fitted brides of every body and every circumstance, and there is almost always a way to take a measurement that captures what we need to build a gown that fits you beautifully.
Choose options
Questions & Answers
Have a Question?
Be the first to ask a question about this.
Frequently Asked Questions
Sizing, Customization & Fit
Forget standard sizing, every MYWONY gown is made-to-measure. While the price is based on a standard size range, the final dress is crafted to your unique body. After you order, we'll send you our detailed guide to taking your personal measurements. It’s a simple process we’ll guide you through to ensure a beautiful custom fit.
Absolutely. We love helping you create a gown that is uniquely yours. Most of our designs can be personalized. Common customizations include:
- Changing the neckline
- Adding or removing sleeves
- Adjusting the train length
- Modifying colors or fabrics
- Swap the skirt between garments
- Swap features between dresses
Share your vision with us, and we'll let you know what's possible. Please note that while we excel at personalization, we do not replicate gowns from other designers.
It's completely normal for a made-to-measure gown to require minor final tweaks for that perfect "glove" fit. We recommend budgeting for a local seamstress to handle these small adjustments.
Of course! We know how important it is to feel the materials and see the exact shades in person. We offer a fabric swatch kit that you can order from our shop before making your final decision.
Timing & Production
Our standard production schedule is approximately 12 weeks per order.
We recommend placing your gown order 6–8 months before your event.
This timeline accounts for our standard production period and provides ample time for shipping and any necessary local alterations.
If you need your dress sooner, we can expedite the process with after-hours work, we offer 4-week and 8-week rush production options for an additional fee.
Shipping & Policies
Yes, we are honored to ship our gowns to brides worldwide using tracked, reliable carriers.
Please note that the price does not include local taxes or import duties, which vary by country. As the buyer, you are responsible for these fees. We are happy to provide an estimate of these costs for your country to help you budget accordingly.
Due to recent changes in U.S. import tariffs, all orders shipped to the United States are subject to a 10% surcharge. This adjustment reflects the increased import costs and ensures compliance with current trade regulations.
Please note that all packages shipped to the USA are fully taxed prior to dispatch. This means no additional customs duties or import taxes will be applied upon delivery.
The price displayed at checkout is the final price — there are no hidden fees or surprise charges when receiving your package.
If you have any questions about your order or U.S. shipping policies, please contact our support team before placing your order.
Because every gown is made-to-order especially for you, we cannot accept returns or exchanges.
You may cancel your order for a full refund within 24 hours of purchase. After this window, the order is final and production begins. Your happiness is our absolute priority, so if you have any concerns upon receiving your gown, please contact us immediately so we can find a solution together.
If we are unable to ship or create the order you placed, we guarantee a full refund.